Page 2 of 3
Re: Simple (plain) capes
Posted: Thu Jul 25, 2013 7:19 pm
by ludzik
Thanks for the links on printing - things got busy for me so I probably wont get a chance to play with that for a while BUT I'm making progress on the plain ones. Here's some thoughts that I have on the topic after recent work
- clear nail polish needs to be applied twice - first application is "thicker" so that it soaks the material thoroughly, then the material needs to be ironed (I recommend ironing on the opposite side from the application side) and then cut out. Second application needs to be "thinner" and the cape again should be ironed after it dries.
- when negotiating with your wife the usage of nail polish, one has to make sure that the line "honey, just so you know I will end up using ALL of it" is understood as "when I'm done the bottle will be empty

While I'm not at the empty stage yet, as the work and the trial is progressing the loss of volume in the bottle can be clearly seen which shocked my wife as she thought that I won't use it all
Re: Simple (plain) capes
Posted: Wed Jul 31, 2013 5:49 pm
by Lamanda2
Hi there!

Great work on these capes! Something to add for anyone interested in crafting capes for their armies. When it comes to keeping the fabric from fraying and giving it that nice, crisp feel we've come to know and love from our official Lego capes, I recommend a product called 'Aleene's Stiffen Quick', which can also be picked up at your local Jo-Ann Fabrics store (don't forget those coupons! 40% off will save you a couple extra bucks!) -- it's a spray, and I usually get a good yield of capes per bottle.

The trick is to give it a few coats - Spray the fabric well, let it air dry, blow dry it, iron it, however you feel comfortable drying it, then add another coat or two. It's a great product. c:
As far as printing on capes goes, I'm uncertain if a laser printer would be suitable for fabric. From my limited use of laser printers, I feel as though the ink is more like a film than a dye or liquid like with inkjets, so I'm not sure how that would work on cloth. But hey, who knows till you try it out!
~Amanda
Re: Simple (plain) capes
Posted: Wed Jul 31, 2013 9:35 pm
by ludzik
Thanks Amanda - it seems that very varied effects can be achieved with various treatments. I am currently experimenting with a different clear nail polish which results in a softer cape (not as stiff/rigid). I am going to track down the ingredients for the two that I used to see what's the difference (btw, if anyone is versed in nail polish one is just nail polish the other is base plus coat).
Re: Simple (plain) capes
Posted: Wed Aug 07, 2013 2:34 pm
by ludzik
I think I have reached Nirvana
My winning formula is
- Dritz 1674 Fray Check Liquid Seam Sealant (
http://www.amazon.com/Dritz-1674-Liquid ... B000YQKIDY) which at Joann's is 5.99 and if you use a 40% off or 50% off coupon ... well it becomes very inexpensive for the 2 pack.
- Wet n Wild nail protector
http://www.walgreens.com/store/c/wet-n- ... 70-product $.99 at Walgreens, Target, etc
- broadcloth - your choice of color
First I use the fray check/seam sealant liquid on the material in order to stiffen it up a bit making it easier to cut it and giving it the first protective "base". Then I use the nail protector. Btw, you can only do one layer of the nail protector - it soaks in and through making the material slightly stiff (about the same level as the LEGO cape). If you do another layer afterwards it ends up very stiff and it forms a surface layer and it doesn't look too good...
Re: Simple (plain) capes
Posted: Wed Aug 07, 2013 3:11 pm
by AK_Brickster
How do you apply the anti-fray liquid? With a spray nozzle or brush? Also, do you dilute it at all?
I'm assuming the nail protector is just applied using the brush that comes with it.
Re: Simple (plain) capes
Posted: Wed Aug 07, 2013 3:46 pm
by ludzik
AK_Brickster wrote:How do you apply the anti-fray liquid? With a spray nozzle or brush? Also, do you dilute it at all?
The anti fraying liquid is in a squeeze bottle with a small tip that gets cut off. To apply it, I lay out first some old paper (you probably want old printer paper with not much print on it as you don't want to transfer print onto your material
) and then lay out a strip of fabric. I then apply lines onto the fabric from the nozzle and then fold the fabric over and kind of slide it around (the folded sides against each other). Then I unfold and look to see if the color change is even - if there are some spots that don't seem "penetrated" I put drops (or lines or whatever shape the empty spot is) of the liquid on it and then I use a blue heavy duty paper towel to smear it around.
One thing I have started considering last night is to cut out small rectangles just hair bigger then the cape would be and submerging them in a "bath". Btw, I don't dilute the liquid as I think it's just strong enough for my needs and if I was to dilute it I'd not get the desired effect.
I'm assuming the nail protector is just applied using the brush that comes with it.
yup
Re: Simple (plain) capes
Posted: Wed Aug 07, 2013 11:37 pm
by SSchmidt
Hey Ludzik,
would you be willing to post some pictures of your work?
I would love to see a "finished" cape
Re: Simple (plain) capes
Posted: Wed Aug 07, 2013 11:53 pm
by ludzik
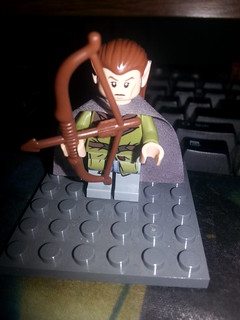
I have updated the flickr set to include a pic of the unfinished capes - brown and green have the first treatment and the holes punched, black only has the first treatment. Rest of the pics show capes on the minifigs
Re: Simple (plain) capes
Posted: Fri Aug 09, 2013 10:55 pm
by ludzik
I have reached the holy grail ! (ok maybe a holy mug??
)
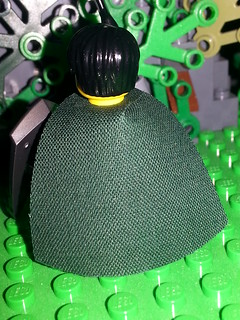
Playing with the depth of the cut I was able to achieve a tighter fitting (flatter) cape. As you can see from the pics in the set the cape does not show any bending or folding and there is still some room left between the hair and the back of the cape. I know.... in reality the hair would be laying on top of the cape resulting in no space/gap BUT if the minifig hair would be on top of the cape then the cape sadly would fold / bend in that spot .....
Re: Simple (plain) capes
Posted: Mon Aug 12, 2013 2:50 pm
by SSchmidt
So the capes came in. With your approval Ludzik I will post some pics of them
Re: Simple (plain) capes
Posted: Mon Aug 12, 2013 3:26 pm
by ludzik
SSchmidt wrote:So the capes came in. With your approval Ludzik I will post some pics of them
Please do so. Also feel free to post here what you think of them. I"m curious of an independent opinion
Re: Simple (plain) capes
Posted: Mon Aug 12, 2013 5:40 pm
by AK_Brickster
Very cool! I might have to get a few of those from you if you start doing them in a few different colors. I mainly use browns, greens, and blues.
Re: Simple (plain) capes
Posted: Mon Aug 12, 2013 6:07 pm
by ludzik
AK_Brickster wrote:Very cool! I might have to get a few of those from you if you start doing them in a few different colors. I mainly use browns, greens, and blues.
I have done them already in brown and green and blue is on my to do list
I'll pm you
Re: Simple (plain) capes
Posted: Wed Aug 14, 2013 4:45 am
by ludzik
here's a fresh of brown ones I just did

Re: Simple (plain) capes
Posted: Thu Aug 15, 2013 5:59 pm
by Ferretclaw
Those look more like black then brown...
