
I've had a few folks ask me about the stained glass windows in my recent Church, so this post will provide a few details of the construction.
These windows are based on using the 1x1x2/3 slopes in the various trans-colors. Currently, these parts are available in trans-green, red, black, blue, yellow, and dark orange. I've heard that trans-orange ones exist, but the sets that supposedly have them contained trans-dark orange for me.
As you can see
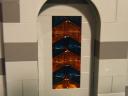
with a little work, you can get the height of the window and opening to match.
Or you can add some decoration to the window with an arch.
The variety of colors allows many combinations of colors and patterns. The actual look of the window will depend on the amount of both reflected and transmitted light.
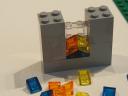
These parts stack nicely, and I build up a window in the opening, as I build the building.
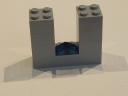


If you need stability in the window, because you will be moving the MOC, or if you will not be using an interior, then a supporting wall of clear bricks can be used.
You can also create round windows. I build this large window with a combination of 1x1x2/3 slopes and trans brick.
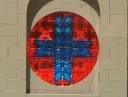
Because the window is made up of 3 sections (center and each side), the geometry does not have to be exact.
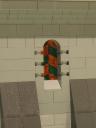
This smaller window
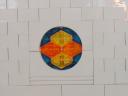
is similar in construction to the tall narrow windows.

It is made from 4 columns of stacked slopes. The top row and bottom rows are connected to the studs of 1x4 plates for stability. I use clear bricks around the edges. This allows more light to flow through the window, and thus seem brighter. With opaque wallbricks right up against the trans slopes, the window just looks darker.
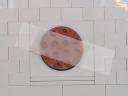
For transport, a wheel taped in place works great.
I hope this provides sufficient detail to answer the questions. If you have any more questions, or comments, I would love to read them.
Jim


