 
       
|
Fire Strands
Forestboy
Tell me, do you have your mages, wizards, and necromancers casting fire like this? Like a wimp?

Would you rather have them cast fire like this?

In this how-to-article, youll learn an invaluable building technique that you will love using. Youll also get a big list of ideas to use it in, and a compilation the best mocs show casing the fire strand technique.
Part 1: The Fire Piece
General Info:
The fire piece, fire, or part #6126, is a pretty common piece. It comes in six colors, Trans. Dark Orange, Neon Trans. Orange, Trans. Green, Trans. Light Blue, Trans. Purple, and Trans Red (Trans = Translucent).
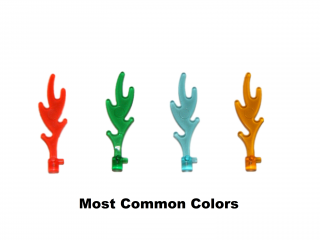
Dark orange, neon orange, light blue, and green are four most common, but Dark Orange is the most common out of all of them. Red and purple have only been in one set each, so they are very rare.
Now that you know general information on the fire piece now you will learn the components of it:
Components:
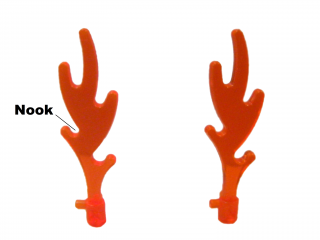
The fire piece has four distinct parts, the flame, the connection nook, the stubs, and the base or tube.

The Flame: The part of the element that most commonly looks like fire. It has the connection nook in it.
Connection Nook: The part of the element that is a little outlet or "hole" in the flame that allows you to securely put a stub through.
The Stubs: The part of the element that stops you from sliding the base all the way through to the flame. It is the most important part for making fire strands.
Base/Tube: The part of the element that lets you slip the fire piece on another piece such as a 1x1 cylinder piece.
Make sure you remember these parts of the piece. Now that we know about the fire piece and it's parts, we can move on to connecting several fire pieces together to make a fire strand!
Part 2: Connecting the Fire Pieces to Make a Strand
Connecting the fire pieces surprisingly takes no cutting, bending, melting, hacking, or modifying of any sort. All you need are at least two fire pieces and your hands. It only takes five easy steps too.

Step 1: First, take one of you fire pieces and hold it in your left hand and so that the flame is showing the stubs are facing away from you (One will be on the left sticking out)(See picture above).

Step 2: Second, pick up the other fire piece in your other hand and position it just like you did in Step 1 so that the flame is showing the most and the stubs are away from you(See picture above).
Step 3: Next, locate the connection nook in the flame of the fire in your left hand. (See picture above)

Step 4: Then put them parallel to each other (See photo) so that the one in your right hand will be closer to your face than the one in your left. Still have the stubs away(See picture above).
 
(Green used to show connection)
Step 5: Lastly, push the stub of the fire piece in your right hand through the connection nook in your left hand to create a strand (See pictures above).

And there you have it! You have yourself a fire strand! But wait! It doesnt stop there. Repeat this process over and over, with 10, 15, or even 20 pieces and you can have one like this:

(^^^ 20 Strand ^^^)
And if you're left handed instead of right, simply use your right when it tells you to use your left and vice versa.
Now you may have just learned this awesome technique and you dont know what to put it in, so heres a big list of what you can use it with:
Warning - Very recently the mold to make the fire piece has been changed, so that there are no more stubs. This means that with newer sets, you will not be able to connect the flames if they use the newer mold. This new mold does have some advantages; that little stub prevents you from inserting the old flame piece into, say, a brown space gun to make a torch, so new pieces can lead to new functionality. However, this does make sorting your flame elements annoying, since they look otherwise identical. The new one is on the left.

Part 3: Ideas
Dark Orange/Neon Orange:
Flamethrower,
Building Fire,
Mage/Necromancer shooting fire,
Burning from a siege,
Burning field (battle),
Burning corn field (Or crops in general),
Sacrifice,
Vikings pillaging a village,
Dragon breathing fire,
Pit fire for a feast,
Fire in a fireplace,
Science explosion.
Green:
Toxic Waste,
Seaweed,
Weird Magical Fire.
Light Blue:
Waves,
Water coming from a mage/wizard,
Science Experiment.
Red:
Fire,
Blood,
Wine.
Purple:
Magical Fire,
Wine/Grape Juice.
Part 4: Inspiration/Great MOCs that use Fire Strands
Forest Fire by JD Luse 
Forest Wizard by Hippotam 
In Motion by Nannan Z 
Dark Phoenix by Tony Sava 
I'm Melting by Titolian 
Loki's Champion by Shadow Viking 
Flaming Skull by Mt.Dew Monkey 
Maleficus Vipera by DARKspawn 
In conclusion, I hope you enjoyed learning about the fire piece, learning how to make a fire strand, and got some great inspiration. Now get out there and build!
|
|
